
English


Views: 0 Author: Site Editor Publish Time: 2026-06-23 Origin: Site


Setting up a new irrigation network often triggers a heavily debated question among both commercial growers and residential landscapers. The specific orientation of emitter holes frequently causes intense confusion during the crucial system rollout phase. Leaving this detail to chance puts your entire harvest at significant risk. Incorrect orientation directly leads to premature clogging, uneven water distribution, and aggressive root intrusion underground. These completely avoidable issues eventually cause catastrophic system failures and severe crop losses right when plants need water most. The direct answer is simple: for 99 percent of modern applications, your emitters must face straight up toward the sky. Throughout this comprehensive guide, you will learn the underlying fluid dynamics making upward-facing emitters essential. We will also explore the rare exceptions and break down critical installation practices to ensure your crops thrive continuously.
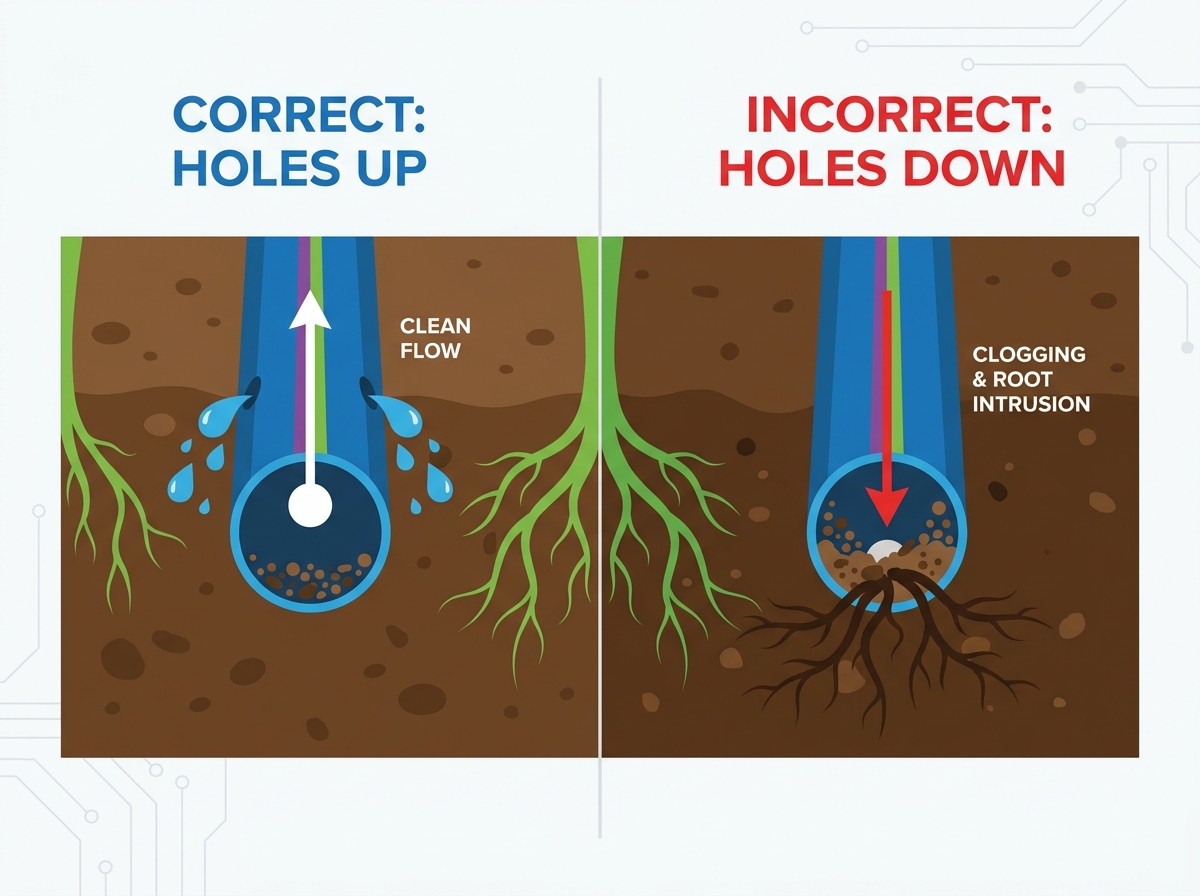
Always Face Emitters Up: Gravity causes sediment and particulates to settle at the bottom of the tube; upward-facing emitters avoid this debris.
Root Intrusion is Real: Downward-facing holes invite thirsty roots to grow directly into the water source, destroying the system.
Product Nuances Matter: Whether using flat drip tape or rigid tubing, the orientation rule applies, though installation techniques vary by wall thickness.
ROI Depends on Proper Rollout: Preventing twists during installation is just as critical as the initial orientation to ensure consistent flow rates.
Understanding the physical realities inside an irrigation line helps clarify this strict installation rule. Water dynamics dictate how particles and pressures behave within confined spaces. Following these scientific principles guarantees system longevity.
Fluid dynamics inside a pressurized line follow predictable patterns. High-quality filtration removes large debris effectively. However, microscopic sediments always manage to enter the water stream. Once inside, gravity pulls these tiny particulates directly downward. Over time, sediment accumulates along the bottom ridge inside the tube. If you face the holes downward, they sit directly in this sludge layer. Emitters quickly swallow this mud and clog permanently. Upward-facing holes pull from the cleanest water layer near the top. They safely avoid this dangerous debris zone.
Plant roots display a biological trait called hydrotropism. This means they actively grow toward moisture sources. Downward-facing emitters drip water directly onto the soil below. Roots sense this moisture and follow the wet path upward. They eventually locate the emitter opening itself. Thirsty roots will grow directly inside the plastic housing. Once inside, they expand rapidly and block all water flow. An upward-facing hole drops water down the sides of the tubing instead. This creates an air gap, preventing roots from finding the exact water source easily.
Irrigation systems undergo major pressure changes daily. Shutting off the water supply triggers an immediate physical reaction. As water drains away naturally, the line creates a slight internal vacuum. Negative pressure sucks surrounding matter inward temporarily. Downward-facing emitters sit directly against wet mud. The vacuum forces them to ingest soil immediately. Upward-facing emitters sit exposed to open air. They safely draw in clean air to equalize internal pressure instead of mud.
Proper orientation yields highly predictable success metrics for farm operations. Emitters facing the sky extend the overall operational lifespan significantly. You avoid mid-season emergencies requiring manual line flushing. Field workers spend less time replacing ruined sections. Crop yields remain consistent because water distribution stays uniform across every single row.
Many growers naturally question if specific scenarios warrant breaking the primary installation rule. Certain environmental setups prompt operators to reconsider emitter direction. Exploring these edge cases provides much-needed clarity for skeptical readers.
Most operations lay lines directly on the soil surface. Others place them just beneath a layer of protective plastic mulch. For these common applications, the "up" rule remains completely non-negotiable. Sunlight exposure and surface temperatures do not change fluid dynamics. Facing the holes downward here guarantees immediate dirt ingestion. Maintain the upward orientation strictly.
Subsurface Drip Irrigation represents the primary edge case causing industry confusion. When burying agricultural drip tape deeply underground, logic sometimes falters. Some growers assume downward holes prevent heavy soil compaction from crushing the emitter. The reality surprises many new installers.
The Reality: Even in deep SDI setups, emitters should generally face upward. Water still pools below the line, and sediment still settles internally.
The Caveat: SDI systems never rely on downward orientation to fight clogs. Instead, they require specialized air and vacuum relief valves. These valves break the suction effect completely.
Chemical Protections: Modern SDI lines also utilize chemically treated root-guard technology. This specialized plastic deters root intrusion regardless of hole direction.
Different materials demand specific handling techniques during the field layout process. Evaluation dimensions rely heavily on product features and material realities. Recognizing these nuances prevents devastating mistakes before you even turn the water on.
Manufacturing processes create distinct visual markers on certain products. Handling flat drip tape requires careful attention to these built-in indicators. You will usually notice a prominent visible seam running along one side. Depending on the manufacturer, this seam typically houses the actual emitter path. Most brands also print a brightly colored stripe alongside this seam. Instruct your field crews to keep this colored stripe facing the sky constantly. This simple visual check ensures flawless orientation across hundreds of acres.
Selecting thinner materials changes your operational risks entirely. The vulnerabilities of thin wall drip tape demand strict rollout protocols. Materials ranging from 4-mil to 8-mil possess extreme flexibility. They become highly susceptible to severe kinking if unrolled carelessly. Twisting these thin lines accidentally forces emitters downward intermittently. This creates localized dry spots throughout your crop rows. Your harvest will suffer from uneven growth simply due to poor handling during installation.
Emitter design directly dictates how water flows across varying elevations. Pressure compensating (PC) emitters feature internal silicone diaphragms. These flexible diaphragms regulate flow dynamically as line pressure fluctuates. Some installers believe PC capabilities negate the need for upward orientation. This assumption proves dangerously false in practice. PC emitters still require an upward-facing posture to protect their sensitive internal mechanics. Sediment settling on a downward-facing PC diaphragm ruins its ability to flex. The emitter will stick open or jam completely shut.
Operational realities often expose flaws in your initial system design. Field crews frequently make seemingly minor errors carrying major consequences. Learning these rollout lessons beforehand mitigates severe risk later.
Improper unrolling techniques destroy line integrity immediately.
The Mistake: Workers often pull material from the side of a stationary roll lying flat on the dirt. This action introduces a harsh twist every single time the line completes a loop.
The Fix: Always use a properly designed spool carrier. Tractor-mounted implements work best for large fields. The roll must spin freely on a central axis. This ensures the material lays perfectly flat without spiral tension.
Pulling lines too tightly alters their physical dimensions drastically. Workers sometimes stretch the material to make it look straight and neat. Excessive tension distorts the shape of the precision-cut emitter slits. Distorted slits change your carefully calculated flow rates immediately. Furthermore, stretched plastics snap easily when environmental temperatures drop overnight. Always leave a slight amount of slack to accommodate thermal expansion and contraction.
Installation inherently introduces contaminants into your pristine network. Dirt, PVC shavings, and small insects enter the open mainlines during assembly. Failing to flush these lines before closing the terminal ends proves disastrous. You must run water through the open lines vigorously. This flushing process pushes construction debris out onto the ground safely. Skipping this step forces that debris straight into your upward-facing emitters, causing instant failure on day one.
Building a successful irrigation network requires a logical buyer decision framework. Shortlisting the right components ensures your crops receive optimal hydration efficiently. Consider these fundamental steps before finalizing your system design.
Material thickness dictates durability against rocky soil and insect damage. You must match the mil rating to your specific agricultural timeline.
Mil Thickness | Lifespan/Usage | Ideal Crop Types | Soil Conditions |
|---|---|---|---|
4-mil to 6-mil | Single short season | Lettuce, seasonal greens | Fine, sandy, rock-free soil |
8-mil | Full single season | Peppers, melons, cucumbers | Standard loamy soil |
10-mil to 12-mil | Multi-season / Over-winter | Tomatoes, heavy yielding crops | Moderate rocks, heavy clay |
15-mil or higher | Multi-year installation | Orchards, perennial berries | Highly abrasive, rocky terrain |
Choosing proper spacing relies entirely on your soil type and plant density. Soil exhibits varying degrees of capillary action. Heavy clay spreads water horizontally outward very efficiently. Sandy soil allows water to drain rapidly straight down. Tie your spacing decisions to these realities. Use 4-inch spacing for densely planted greens in sandy conditions. Opt for 12-inch or 18-inch spacing for spaced-out tomato crops in loamy soils. Matching spacing to capillary action prevents wasteful water overlap.
Many beginners assume proper orientation replaces the need for filtration. Upward-facing emitters do protect against internal sediment settling effectively. However, they cannot stop large debris from entering the system initially. You must install a reliable 150-to-200 mesh screen or disc filter. Place this filtration unit directly at the system head. Clean these filters weekly to maintain proper operational pressure.
Your next move requires careful mathematical planning. Map out your exact row lengths precisely. Calculate your total gallons per minute (GPM) requirements based on your water source. Consult a professional sizing chart to avoid exceeding your pump capacity. If you need technical assistance evaluating your next drip tape purchase, gather these measurements first. Proper planning guarantees your new setup performs flawlessly from the very first watering cycle.
The final verdict regarding irrigation line orientation leaves no room for debate. You must place your lines with the emitter holes facing straight up. This crucial habit prevents destructive sediment clogs, stops aggressive root intrusion, and avoids vacuum-suctioned dirt from ruining your investment. Remember that buying high-quality agricultural materials solves only half the battle. Your equipment remains only as effective as your rollout methodology. Avoid stretching, prevent twists, and always flush your mainlines before closing the ends. We strongly encourage you to review your current field setups today. Browse our expansive catalog of specialized irrigation components, or reach out to our dedicated technical support team to spec out a custom, high-efficiency watering system tailored for your specific farm.
A: Manufacturers design these products with clear visual indicators. Look for a continuous colored stripe running down one side of the line. You will also feel a distinct tactile seam along that same edge. The emitters sit precisely on this seam. Always keep this colored stripe facing upward.
A: Yes, you can bury lines shallowly beneath topsoil or plastic mulch. However, the upward-facing rule still applies completely. For true deep subsurface irrigation, you must still face emitters up. You will also need specialized vacuum relief valves to prevent soil suction when the water turns off.
A: Upward orientation prevents sediment settling, but it cannot fix terrible water quality. Inadequate main filtration often lets large particles bypass the screen. Heavy mineral buildup from hard water also creates calcium scale inside the emitters. You must install a 200-mesh filter and routinely flush the line ends.
A: The orientation rule remains identical regardless of terrain gradients. Emitters must always face up. However, steep slopes drastically alter internal water pressure. Gravity forces excessive water to the lowest points. To combat uneven watering on hills, you must prioritize using pressure compensating (PC) emitters.


